Final Drive Cover, Replacing
- When replacing the final drive cover the shim for the pre-loading differential must be determined again.
- This shim is located behind the outer race / angular contact ball bearing inside the final drive cover.
Special tools and workshop equipment required
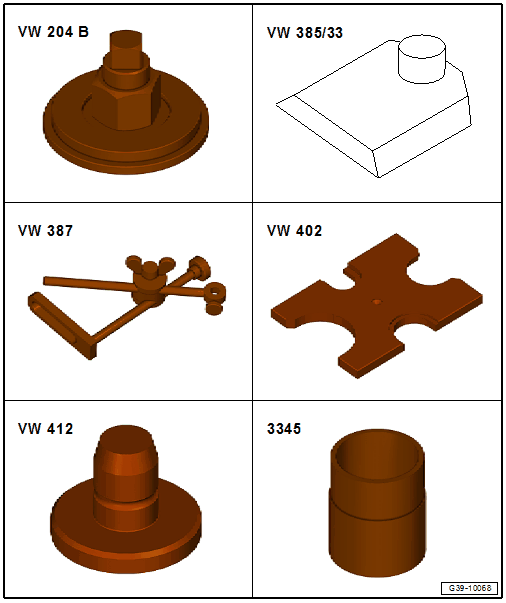
- Seal Installer - Crankshaft: VW 204 B
- Measuring Set - End Gauge: VW 385/33
- Dial Indicator Holder: VW 387
- Press Plate: VW 402
- Press Piece - Multiple Use: VW 412
- Bearing Installer - Wheel Bearing: 3345
Special tools and workshop equipment required
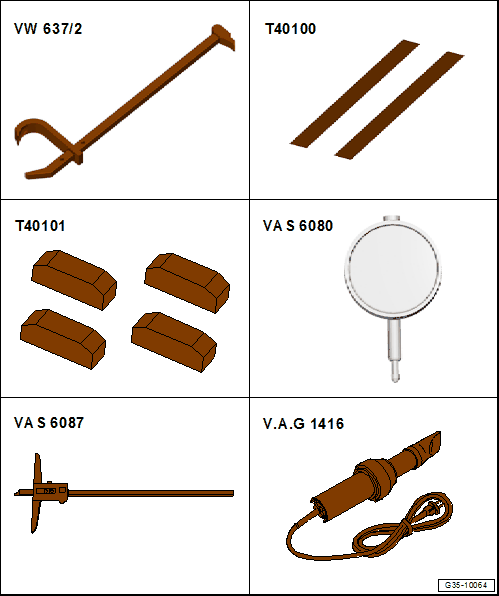
- Puller - Grease Cap: VW 637/2
- Ruler (2 pc.): T40100
- Caliper: T40101
- Dial Indicator: VAS 6080A
- Digital Depth Gauge such as : VAS 6087
- Hot Air Blower: V.A.G 1416 or Wiring Harness Repair Set - Hot Air Blower: VAS1978/14A
Special tools and workshop equipment required
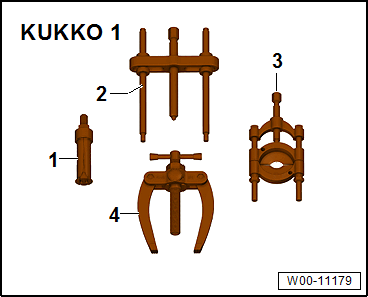
- -4- Internal Puller (Kukko 21/89): VAS 251 619
- -1- Counter Support (Kukko 22/4): VAS 251 625
- Remove the transmission. Refer to TRANSMISSION, REMOVING .
-- Secure the transmission on the transmission holder. Refer to SECURING ON ENGINE AND TRANSMISSION HOLDER .
-- Turn the transmission so that the final drive cover faces upward.
-- Remove the right flange shaft. Refer to RIGHT FLANGE SHAFT, REMOVING AND INSTALLING .
-- Remove the seal -arrow- for the right flange shaft using an extractor lever.
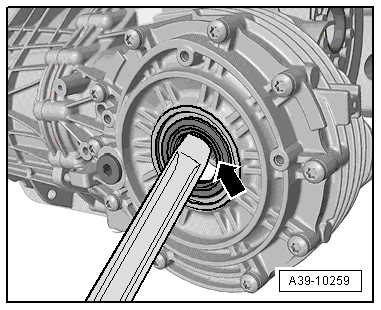
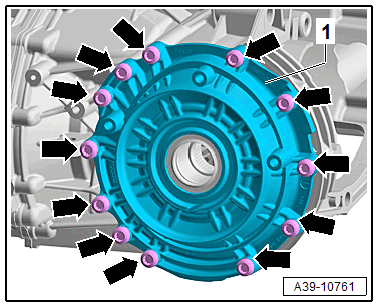
-- Remove the bolts -arrows- and remove the final drive cover -1-.
-- Warm the final drive cover to approximately 100 °C (212 °F) with the Hot Air Blower so that the outer race for the angular contact ball bearing can be more easily removed.
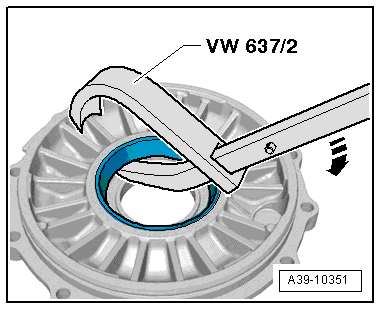
-- Then press the angular contact ball bearing outer race slightly out of the bearing seat by gradually installing the Puller - Grease Cap: VW 637/2 in small steps and pressing in the -direction of the arrow-.
-- Then remove the angular contact ball bearing outer race -3- using the Internal Puller (Kukko 21/89): VAS 251 619 -2- and the Counter Support (Kukko 22/4): VAS 251 625 -1-.
 Courtesy of AUDI OF AMERICA, LLC
- Counter Support (Kukko 22/4): VAS 251 625
- Internal Puller (Kukko 21/89): VAS 251 619
-- Remove the old shim.
Shim, Determining
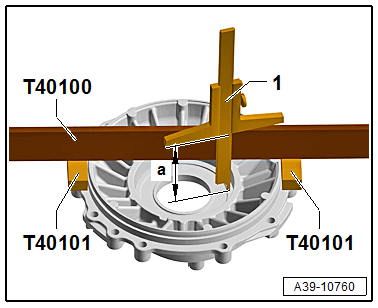
Measure the dimension -a- on the old and new covers as follows:
-- Position the Caliper (4 pc.): T40101 on the opposite sides of the bolting surface for the final drive cover.
-- Place the Ruler (2 pc.): T40100 upright on these Calipers.
-- Use digital depth dimension (such as Digital Depth Gauge: VAS 6087 ) to measure in the bearing seat for the outer race/angular contact ball bearing.
Example:
| Dimension -a- for the old final drive cover | 82.05 mm |
| Dimension -a- for the new final drive cover | 82.20 mm |
| Difference | = 0.15 mm |
-- Install a thicker adjusting shim if the dimension -a- on the new cover is smaller.
-- Install a thinner adjusting shim if the dimension -a- on the new cover is larger.
Example:
| Old shim | 1.30 mm |
| Difference | - 0.15 mm |
| New shim | = 1.15 mm |
- Allocate adjustment shim according to the Parts Information.
-- In this example, the adjusting shim thickness is 1.15 mm.
-- Install the new adjusting shim in the new final drive cover.
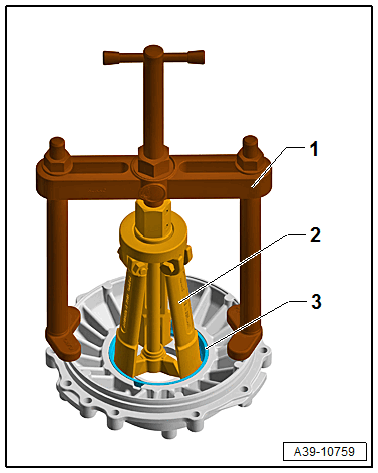
-- Press in the outer race/angular contact ball bearing all the way, at the same time the larger diameter of the Seal Installer - Crankshaft: VW204B points to the outer race.
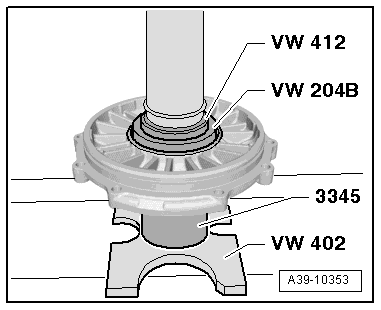
- Support the final drive cover by supporting the Bearing Installer - Wheel Bearing: 3345 directly under the bearing mount.
Check the bearing pre-load measure for the bearing / differential as follows:
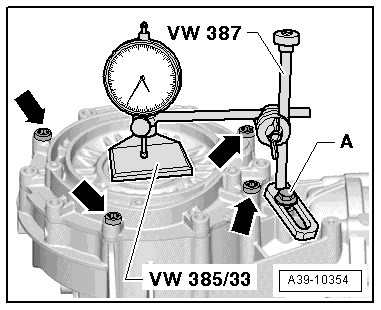
-- Install the final drive cover without an O-ring and tighten the four bolts -arrows-.
-- Remove the measuring tools on the transmission housing.
-- Attach the Dial Gauge Holder: VW 387 to the threaded hole in the transmission housing with the bolt -A-.
-- Place the Dial Gauge Extension on the center of the Measuring Set - End Gauge: VW 385/33 .
-- Set the Dial Gauge, for example Dial Gauge - 0-3mm: VAS 6080 , to >>0<< with 1 mm of pretension.
-- Loosen the four bolts -arrows- diagonally one turn.
-- Read the measured value on the dial gauge.
- It must be 0.25 to 0.30 mm for bearings with less mileage.
- For bearings with higher mileage, the measured value must be a minimum of 0.05 mm.
-- Replace the O-ring -A-.
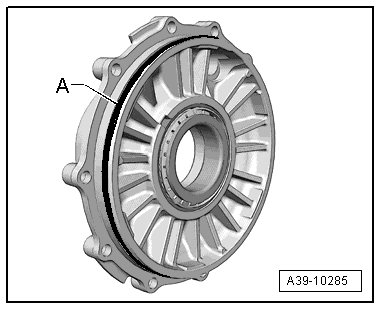
-- Coat the new O-ring with transmission fluid.
-- Insert the final drive cover -1- and tighten the bolts -arrows- to the tightening specification.
-- Install the new right flange shaft seal. Refer to RIGHT SEAL, REPLACING .
-- Install the right flange shaft. Refer to RIGHT FLANGE SHAFT, REMOVING AND INSTALLING .
-- If the transmission fluid is drained, the transmission fluid in the manual transmission must be filled and the fluid level must be checked. Refer to Transmission Fluid .
Tightening Specifications