Overview - Lower Control Arm And Ball Joint
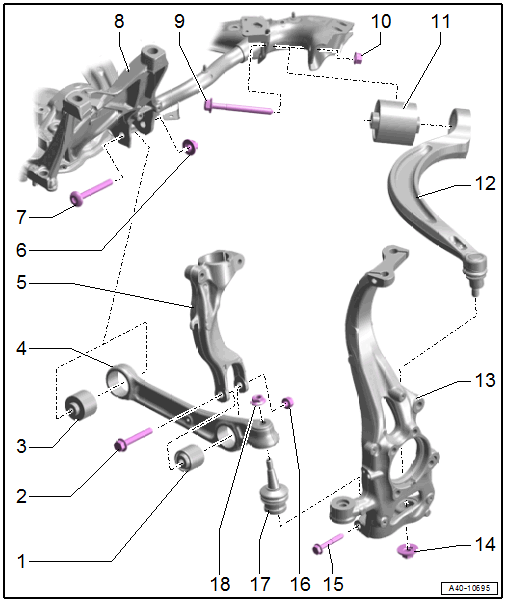
- Wheel Bearing Housing Side Bonded Rubber Bushing
- Always replace. Refer to CONTROL ARM BALL BEARING, REPLACING, WHEEL BEARING HOUSING SIDE .
- Bolt
- Always replace after removing
- Subframe Side Bonded Rubber Bushing
- Always replace. Refer to CONTROL ARM BEARING, REPLACING, SUBFRAME SIDE .
- Control Arm
- Removing and installing. Refer to CONTROL ARM, REMOVING AND INSTALLING .
- Shock Absorber Fork
- Removing and installing. Refer to SHOCK ABSORBER FORK, REMOVING AND INSTALLING .
- Nut
- 70 Nm + 180°
- Always replace after removing
- Tighten in the curb weight position. Refer to WHEEL BEARING IN CURB WEIGHT POSITION, LIFTING VEHICLES WITH COIL SPRING .
- Bolt
- Always replace after removing
- Subframe
- Bolt
- Always replace after removing
- Nut
- 70 Nm + 180°
- Always replace after removing
- Tighten in the curb weight position. Refer to WHEEL BEARING IN CURB WEIGHT POSITION, LIFTING VEHICLES WITH COIL SPRING .
- Bonded Rubber Bushing
- Always replace. Refer to GUIDE LINK BONDED RUBBER BUSHING, REMOVING AND INSTALLING .
- Guide Link
- Removing and installing. Refer to GUIDE LINK, REMOVING AND INSTALLING .
- Wheel Bearing Housing
- Nut
- 140 Nm
- Always replace after removing
- If reusing the guide link, clean the pin threads of the remaining locking compound residue
- Bolt
- 40 Nm
- Always replace after removing
- Nut
- 90 Nm + 90°
- Always replace after removing
- Tighten in the curb weight position. Refer to WHEEL BEARING IN CURB WEIGHT POSITION, LIFTING VEHICLES WITH COIL SPRING .
- Ball Joint
- Removing and installing. Refer to BALL JOINT, REMOVING AND INSTALLING .
- Contact surfaces, inserting in wheel bearing housing. Refer to Installing - INSERT THE BALL JOINT -1- INTO THE WHEEL BEARING HOUSING -2- UP TO THE CONTACT SURFACE -ARROWS-. .
- Nut
- 140 Nm
- Always replace after removing
- If reusing the ball joint, clean the pin threads from of remaining locking compound residue