Remove head airbag
NOTE:
RISK OF DAMAGE
Electrostatic discharge.
Damage to or destruction of electrical components.
Electrostatic discharge.
Damage to or destruction of electrical components.
- Leave electrical components in original packaging until just before they are installed. Use the original packaging only for any return shipments. Always package removed components straight away.
- Read and comply with user information on using the associated special tool 12 7 060.
- Only touch the housings of electrical components. Do not touch pins or multi-pin connectors directly.
- Wear electrically conductive clothing and antistatic shoes (with ESD symbol).
- For additional information see: 61 35... NOTES for ESD protection (electrostatic discharge)
Preliminary works
- Deactivate the 48 v ELECTRICAL SYSTEM .
- Remove the left and right a-pillar TRIM PANEL .
- Remove left and right sun visor COUNTER SUPPORTS .
- Remove the left and right SUN VISORS
- Remove both vanity mirror LIGHTS .
- Remove the right hands-free MICROPHONE .
- Remove the left hands-free MICROPHONE .
- Remove the roof FUNCTION CENTER (FZD).
- Remove the interior mirror COVERS .
- Remove rear interior roof LIGHT .
- Partially remove top left and right b-pillar TRIM PANELS
- Remove both c-pillar TRIM PANELS
- Remove all GRAB HANDLES .
- Lower HEADLINING (with SA403 glass roof).
- Disconnect all battery EARTH LEADS .
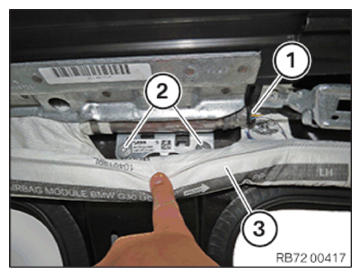
- Loosen screw (1) .
- Unlock and detach the clamps (2) with the special tool 2 230 142.
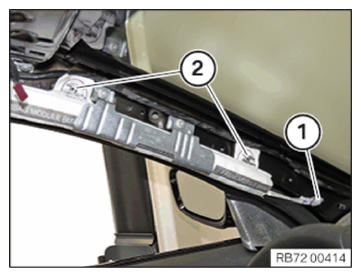
- Unlock and detach the clamps (1) with the special tool 2 230 142.

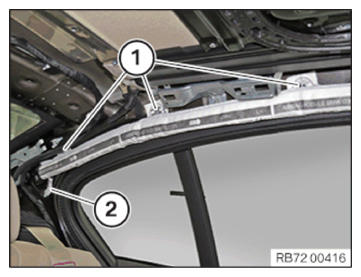
- Unlock and detach the clamps (1) with the special tool 2 230 142.
- Loosen screw (2) .
- Unlock plug connection (1) and disconnect.
- Loosen screws (2) .
- Take off the folding pack (3) with the gas generator.