Installing the electrical steering column
NOTE:
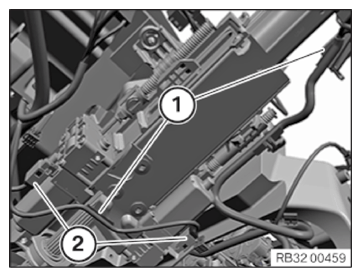
To provide a better overview:
Schematic diagram with partially hidden components.
- Carefully feed in the steering column from the top.
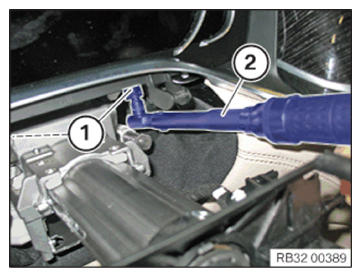
- Connect connectors (2) and lock.NOTE: To reach the plug connections, shift the steering column downward in driving direction.
- Secure cable (1) on the steering column.
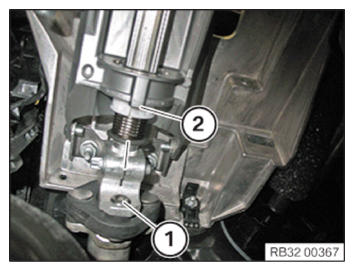
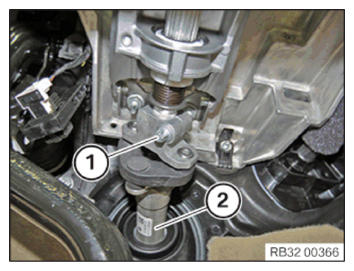
- Observe the marking made at removal for positioning lower steering shaft (1) on steering column (2).
Non-compliance will lead to inclination of the steering wheel.
- Slide the steering column (1) approx. 10 mm into the bottom steering shaft (2).
- Position the steering column on the support of the instrument panel.
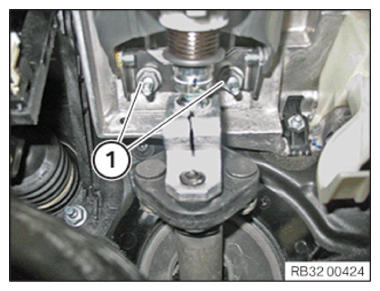
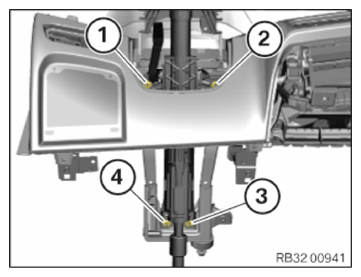
- Fit the nuts (1).NOTE: Do not fully tighten the nuts yet.
- Fit the nuts (1).NOTE: Tightening with the torque wrench (2) follows in the next work step in the sequence.
- It is mandatory
to tighten the nuts in sequence (1) to (4).TIGHTENING TORQUES SPECIFICATION
Steering column to dashboard support M8
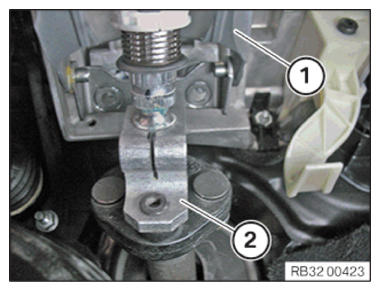
Observe tightening sequence.Tightening torque 21.4 Nm - Fully slide the steering shaft bottom (2) onto the steering column.
- Replace the clamping bolt (1).
Parts: Clamping bolt
- Tighten the clamping bolt (1).TIGHTENING TORQUES SPECIFICATION
Lower steering shaft to steering column Clamping bolt M8 Recut screw thread.
Replace clamping bolt.
No retorque permitted!Tightening torque 28 Nm
Follow-up work
- Install the dashboard SUPPORT .
- Connect the expansion valve REFRIGERANT LINE
- Attach the intake pipe BRACKET .
- Install left front-end strut left intake FILTER HOUSING .
- Install coolant EXPANSION TANK .
- Install the cylinders 5 to 8 control unit BRACKET .
- Install top clean AIR PIPE .
- Install the left DME control unit COVER .
- Install acoustic COVER .
- Install instrument PANEL TRIM .
- Install the INSTRUMENT CLUSTER (KOMBI).
- Install the steering column SWITCH CLUSTER (SZL).
- Install steering column lower section SHROUD .
- Fit steering column upper section SHROUD .
- Install STEERING WHEEL .
- Install STEERING WHEEL .
- Install the steering wheel or sports steering wheel AIRBAG UNIT .
- Install the M sports steering wheel AIRBAG UNIT .
- Install left fold-out COMPARTMENT .
- Install the CENTRAL INFORMATION DISPLAY (CID).
- Install the left dashboard DECORATIVE STRIP .
- Install the light OPERATING UNIT .
- Install the left dashboard SIDE PANEL .
- Install left and right a-pillar TRIM PANEL .
- Install right a-pillar footwell side TRIM PANEL .
- Install the left a-pillar footwell side TRIM PANEL .
- Install both inner front door sill COVER STRIPS .
- Install the dashboard MID-RANGE SPEAKERS .
- Install the dashboard SPEAKER TRIM .
- Install the HEADUNIT HIGH (HU-H).
- Install radio operating unit and air conditioning CONTROL PANEL .
- Install the right dashboard DECORATIVE STRIP .
- Install the right dashboard SIDE PANEL .
- Install the CENTER CONSOLE .
- Install the right footwell TRIM PANEL .
- Install the pedal assembly TRIM PANEL .
- Install the CUP HOLDER .
- Install the center console TRIM .
- Install front storage compartment TRIM .
- Install the center ARMREST .
- Install the center armrest STORAGE COMPARTMENT .
- Install the rear center console TRIM .
- Install the rear VENTILATION GRILLE .
- Install the rear VENTILATION GRILLE (air conditioning system with 4-zone control).
- Install the rear passenger compartment air conditioning CONTROL PANEL (integrated automatic climate control with 4-zone control).
- Reconnect all battery GROUND LEADS .
- Evacuate and charge CONDITIONING .
- Activate the 48 v ELECTRICAL SYSTEM .