Replace the crankshaft seal
WARNING:
High-voltage system.
The high-voltage system operates on the basis of hazardous, electrical voltage and high currents. Mortal hazard through electric shock!
The high-voltage system operates on the basis of hazardous, electrical voltage and high currents. Mortal hazard through electric shock!
- All work on the high-voltage system may only be carried out by specially trained and technically experienced personnel.
- For additional information see:
- For additional information see:
WARNING:
Working on 12 V electrical system.
Risk of short circuits! Risk of fire!
Risk of short circuits! Risk of fire!
- Make sure that there is no charger connected to the jump start terminal in the engine compartment.
- Detach battery ground lead from battery.
- For auxiliary batteries: Detach battery minus cables from all auxiliary batteries.
CAUTION:
Heavy component.
Heavy components can lead to injury or damage.
Heavy components can lead to injury or damage.
- Remove and install heavy components with the aid of another person/other persons.
NOTE:
RISK OF DAMAGE
Damage to battery terminal, the safety battery terminal or the intelligent battery sensor (IBS).
Damaged battery terminals can lead to malfunctions or vehicle electrical system faults.
Damage to battery terminal, the safety battery terminal or the intelligent battery sensor (IBS).
Damaged battery terminals can lead to malfunctions or vehicle electrical system faults.
- Detach battery terminal from battery pole by carefully shifting to and fro. Do not pry off using a tool.
Preliminary work
- Refer to DISCONNECTING ALL BATTERY GROUND LEADS .
- Refer to REMOVING REAR UNDERBODY PROTECTION .
- Refer to REMOVE REAR THRUST FIELD .
- Refer to REMOVE THE CONNECTING SUPPORT FROM THE TUNNEL
- Refer to REMOVE THE REAR AXLE COVER .
- Refer to IF INSTALLED: REMOVE THE TORSION STRUT ON THE RIGHT AND LEFT WHERE REQUIRED .
- Refer to REMOVE COMPLETE EXHAUST SYSTEM .
- Refer to REMOVING THE HEAT SHIELDS .
- Refer to REMOVE TRANSMISSION CROSS-MEMBER .
- Refer to PARTIALLY LOOSENING THE PROP SHAFT
- Refer to REMOVE AUTOMATIC TRANSMISSION (GA8HP75HZ) .
- Refer to REMOVING FLYWHEEL .
- Removing the rear crankshaft seal
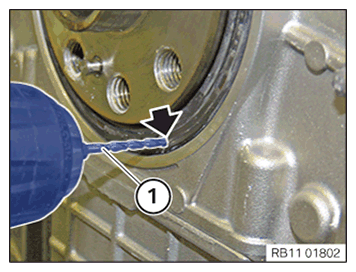
- Drill a hole at the crankshaft seal.NOTE: Use the drill (1) with a maximum diameter of 2.5 mm.
- Remove the shavings immediately with the vacuum cleaner. Do not remove shavings with compressed air!
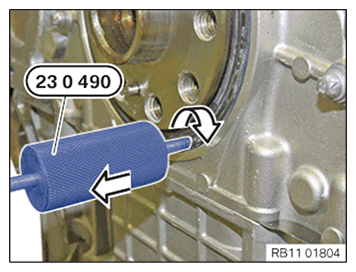
- Screw in special tool 491 454 (23 0 490) in arrow direction.
- Drive out crankshaft seal with impact weight in arrow direction.
- Installing the rear crankshaft seal
NOTE:
RISK OF DAMAGE
Radial shaft seal damage.
Taping the sealing lip (inner) and applying oil to the radial shaft seal will lead to its destruction.
Radial shaft seal damage.
Taping the sealing lip (inner) and applying oil to the radial shaft seal will lead to its destruction.
- Do not tap the sealing lip (inner) of the radial shaft seal.
- Do not apply oil to the radial shaft seal.
- Install the radial shaft seal dry.
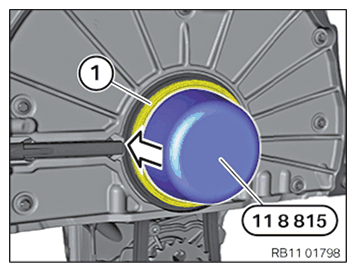
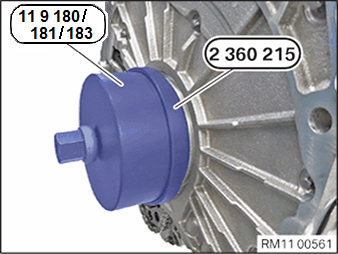
- Preassemble special tool 0 496137 (11 8 815) on crankshaft.
- Carefully slide the crankshaft seal (1) straight off the special tool 0 496 137 (11 8 815) using a rotational movement until the crankshaft seal is positioned flush with the timing case cover.
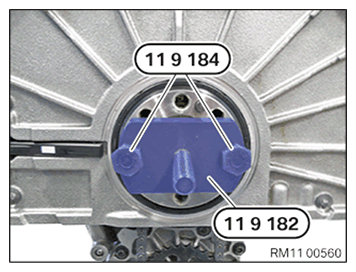
- Secure special tool 0 494 029 (11 9182) to the crankshaft using special tool 0 494 031 (11 9 184).
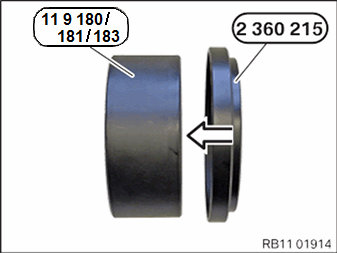
- Connect special tool 2 360 215 onto special tool 0 493881 (11 9180).
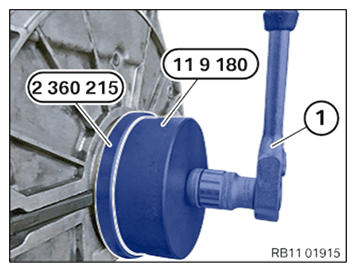
- Move in the crankshaft sealing ring with the special tools 0 494 028 (11 9181) and 2360 215 in combination with the special tool 0 494 030 (119183).
- Tighten the crankshaft seal ring using the tool (1) till reading the stop.
Follow-up work
- Refer to INSTALLING THE FLYWHEEL .
- Refer to INSTALL AUTOMATIC TRANSMISSION (GA8HP75HZ) .
- Refer to FASTENING THE PROP SHAFT (PARTIALLY REMOVED)
- Refer to INSTALLING TRANSMISSION CROSS MEMBER .
- Refer to INSTALLING THE HEAT SHIELDS
- Refer to INSTALLING THE COMPLETE EXHAUST SYSTEM .
- Refer to IF INSTALLED: INSTALL THE TORSION STRUT ON THE RIGHT, AND ON THE LEFT WHERE REQUIRED .
- Refer to INSTALL THE REAR AXLE COVER .
- Refer to INSTALL THE CONNECTING SUPPORTS ON THE TUNNEL
- Refer to CONNECTING NEGATIVE BATTERY CABLE .
- Refer to CHECKING/TOPPING UP THE OIL LEVEL IN THE AUTOMATIC TRANSMISSION .
- Refer to CHECK ENGINE OIL LEVEL .
- Refer to INSTALLING THE REAR THRUST FIELD .
- Refer to INSTALL REAR UNDERBODY PROTECTION .