Install the complete full-flow oil filter
NOTE:
TECHNICAL INFORMATION
The sealing surfaces must be free of oil, grease and cleaning agents.
The sealing surfaces must be free of oil, grease and cleaning agents.
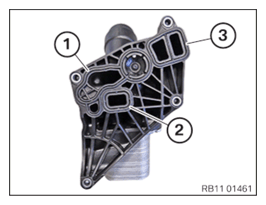
- Replace the gaskets (1), (2) and (3) on the full-flow oil filter.
Parts: Seals
- Have a cleaning cloth ready.
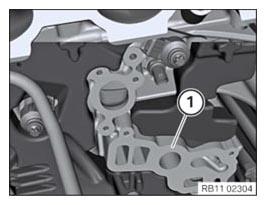
- Crank the engine with the special tool 0 493 380 (116 480) until the motor oil flows out of the oil ducts in the area of the full-flow oil filter (1).
NOTE:
RISK OF DAMAGE
Damage to the surface.
The use of metal-cutting tools (e.g., emery cloths) for cleaning surfaces can damage them and lead to leaks and/or engine damage.
Damage to the surface.
The use of metal-cutting tools (e.g., emery cloths) for cleaning surfaces can damage them and lead to leaks and/or engine damage.
- Do not use any metal-cutting tools.
- Remove gasket residue from the crankcase and the full-flow oil filter with the special tool 0 495 102 (11 4 470).
- Install full-flow oil filter from the top and position it.
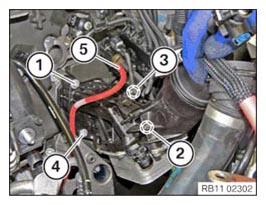
- Tighten screws in the order (1) to (4).NOTE: A green O-ring is installed between the electric changeover valve and the vacuum hose (5). Make sure the green O-ring is installed correctly.TIGHTENING TORQUES SPECIFICATION
Oil filter module to crankcase M6 Tightening torque 8 Nm - Plug vacuum hose (5) to the electric changeover valve.
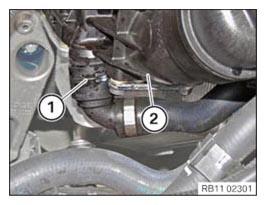
- Lock the closure (1) and attach the coolant hose to the full-flow oil filter (2). Lock must audibly engage.
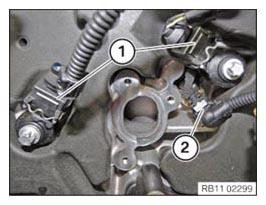
- Connect the connector (2) with the coolant temperature sensor.
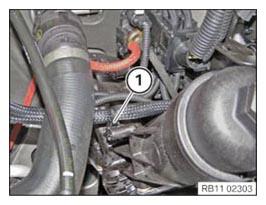
- Connect the connector (1) to the knock sensors.
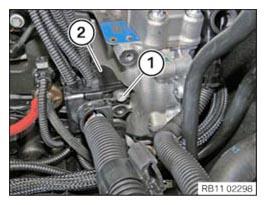
- Position engine wiring harness (2).
- Tighten down screw (1).TIGHTENING TORQUES SPECIFICATION
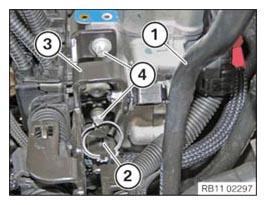
Cable duct to cylinder head, rear M6x16 Tightening torque 8 Nm - Position the holder (3) and secure with the screws (4).TIGHTENING TORQUES SPECIFICATION
Intake plenum holder on engine BM6x16 Tightening torque 10 Nm - Fasten the positive battery cable on the clip (2) from the holder (3).
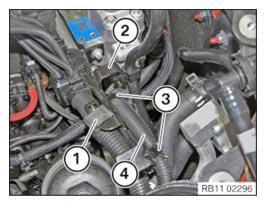
- Clip in the ventilation line (1) on the holder (3).
- Attach the engine wiring harness with the holder (1) on the holder (2).
- Attach the wiring harness (4) and fasten it with the clips (3).
- Fasten the positive battery cable with the clip (1) the full-flow oil filter.
Follow-up work
- Refer to INSTALLING CONNECTING BRACKET ON THE ENGINE BLOCK .
- Refer to PREPARING THE THERMOSTAT FOR INSTALLATION .
- Refer to INSTALLING THE THERMOSTAT ON THE TRANSMISSION OIL LINES .
- Refer to INSTALLING THE INTAKE PLENUM .
- Refer to INSTALLING CONTROL UNIT BRACKET .
- Refer to INSTALLING THE DME CONTROL UNIT .
- Refer to INSTALLING THE TANK VENT VALVE .
- Refer to INSTALLING ACOUSTIC COVER AT REAR .
- Refer to INSTALLING THE FRONT HOOD SEAL AT THE REAR .
- Refer to INSTALLING THE ACOUSTIC COVER FOR THE ENGINE AT THE FRONT .
- Refer to INSTALLING CHARGE AIR LINE .
- Refer to CONNECTING THE COOLANT LINES FOR THE LOW-TEMPERATURE COOLANT CIRCUIT .
- Refer to CONNECTING THE COOLANT LINE OF HIGH-TEMPERATURE COOLANT CIRCUIT .
- Refer to FILLING THE LOW-TEMPERATURE COOLING SYSTEM WITH THE VACUUM FILLING EQUIPMENT .
- Refer to FILLING THE HIGH-TEMPERATURE COOLING SYSTEM WITH THE VACUUM FILLING EQUIPMENT .
- Refer to INSTALLING CLEAN AIR PIPE .
- Refer to INSTALLING RESONATOR .
- Refer to TIGHTENING THE OIL FILTER CAP .
- Refer to TOPPING UP THE MOTOR OIL .
- Refer to INSTALLING ACOUSTIC COVER .
- Refer to VENTING THE LOW-TEMPERATURE COOLING SYSTEM .
- Refer to VENTING THE HIGH-TEMPERATURE COOLANT SYSTEM .
- Refer to CHECKING/TOPPING UP THE OIL LEVEL IN THE AUTOMATIC TRANSMISSION .
- Refer to INSTALLING THE REAR THRUST FIELD .
- Refer to INSTALLING REAR UNDERBODY PROTECTION .
- Refer to INSTALLING THE UNDERBODY PROTECTION OF THE STEERING GEAR OR THE FRONT THRUST FIELD .
- Refer to INSTALLING THE FRONT UNDERBODY PROTECTION OR FRONT THRUST FIELD .
- Refer to CHECKING ENGINE OIL LEVEL .