Tightening the VANOS central valve
NOTE:
TECHNICAL INFORMATION
Assemble the tools for releasing and tightening of the VANOS central valves according to their accessibility.
Assemble the tools for releasing and tightening of the VANOS central valves according to their accessibility.
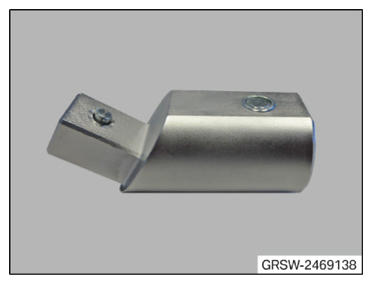
- Have the special tool 2 469 138
ready.
- Have all the special tools and commercially available tools ready.
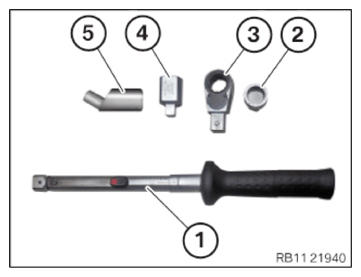
Number Description 1 Standard torque wrench 2 Wrench socket set 2 450 487 3 Reversible ratchet 0 496 855 4 Commercially available reduction 5 adapter 2 469 138 - Assemble all the special tools and commercially available tools as shown.
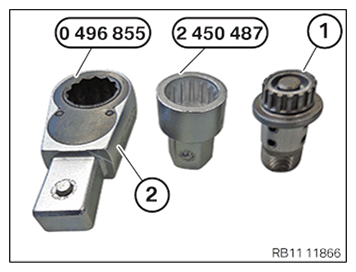
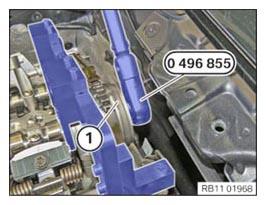
- Use the reversible ratchet (2) from the special tool 0 496 855
with the special tool 2 450 487
to tighten the VANOS central valve (1).
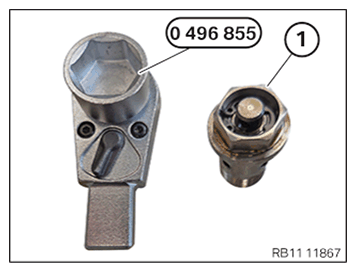
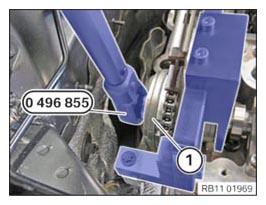
- Use special tool 0 496 855
to tighten the VANOS central valve (1).
- Tighten the VANOS central valve of the intake adjuster (1) with special tool 0 496 855
or 2 450 487. TIGHTENING TORQUES SPECIFICATION
VANOS central valve to camshaft M12 x 1 1. Joining torque 30 Nm 2. Joining torque 50 Nm 3. Angle of rotation 65° M21
VANOS central valve on the thread and on the contact surface must be coated with engine oil.1. Joining torque 50 Nm 2. tightening torque 140 Nm M22
VANOS central valve on the thread and on the contact surface must be coated with engine oil.1. Joining torque 50 Nm 2. tightening torque 140 Nm - Tighten VANOS central valve of the exhaust camshaft adjuster (1) with the special tool 0 496 855.

TIGHTENING TORQUES SPECIFICATION
| VANOS central valve to camshaft | ||
|---|---|---|
| M12x1 | 1. Joining torque | 30 Nm |
| 2. Joining torque | 50 Nm | |
| 3. Angle of rotation | 65° | |
| M21 VANOS central valve on the thread and on the contact surface must be coated with engine oil. |
1. Joining torque | 50 Nm |
| 2. tightening torque | 140 Nm | |
| M22 VANOS central valve on the thread and on the contact surface must be coated with engine oil. |
1. Joining torque | 50 Nm |
| 2. tightening torque | 140 Nm | |
Follow-up work
- Refer to CRANKING ENGINE TWICE (AUTOMATIC TRANSMISSION) .
- Refer to DISASSEMBLING ALL SPECIAL TOOLS .
- Refer to INSTALLING CYLINDER HEAD COVER .
- Refer to INSTALLING BOTH ACTUATORS .
- Refer to PREPARING THE INJECTORS FOR INSTALLATION .
- Refer to INSTALLING THE INJECTORS FOR THE CYLINDERS 4 TO 6 .
- Refer to INSTALLING THE INJECTORS FOR THE CYLINDERS 1 TO 3 .
- Refer to PREPARING FOR THE INSTALLATION OF THE HIGH PRESSURE PUMP .
- Refer to INSTALLING HIGH PRESSURE PUMP .
- Refer to INSTALLING THE HIGH-PRESSURE LINE BETWEEN THE HIGH-PRESSURE RAIL AND THE HIGH-PRESSURE PUMP .
- Refer to INSTALLING FUEL DELIVERY LINE .
- Refer to REPLACING SPARK PLUGS .
- Refer to INSTALLING THE IGNITION COILS .
- Refer to INSTALLING FRONT ENGINE ENCAPSULATION .
- Refer to INSTALLING INTAKE SILENCER HOUSING .
- Refer to INSTALLING THE RESONATOR WITH THE TOP CLEAN AIR PIPE .
- Refer to INSTALLING FAN COWL .
- Refer to INSTALLING THE REAR TOP CROSS CONNECTION .
- Refer to INSTALLING FRONT CROSS CONNECTION .
- Refer to INSTALLING FRONT-END STRUT ON LEFT AND RIGHT .
- Refer to INSTALLING THE COVER ON THE LEFT AND RIGHT IN THE ENGINE COMPARTMENT AT THE TOP .
- Refer to INSTALLING CENTER BULKHEAD LOWER PART .
- Refer to INSTALLING THE SEALING FRAME ON LEFT AND RIGHT .
- Refer to INSTALLING ACOUSTIC COVER AT REAR .
- Refer to INSTALLING THE CENTER COWL UPPER PART .
- Refer to INSTALLING TENSION STRUT ON SHOCK TOWER .
- Refer to INSTALLING WINDSHIELD PANEL COVER .
- Refer to INSTALLING LEFT AND RIGHT WIPER ARM .
- Refer to INSTALLING THE COVER OF THE ENGINE COMPARTMENT ON THE REAR LEFT .
- Refer to INSTALLING THE FRONT HOOD SEAL AT THE REAR .
- Refer to INSTALLING STARTER MOTOR .
- Refer to CONNECTING NEGATIVE BATTERY CABLE .
- Refer to CONNECTING THE DIAGNOSTIC SYSTEM FOR POSSIBLE INTEGRATION LEVEL ENCODING AND PROGRAMMING .
- Refer to INSTALLING THE THRUST FIELD .
- Refer to INSTALLING THE FRONT UNDERBODY PROTECTION OR FRONT THRUST FIELD .
- Refer to INSTALLING ACOUSTIC COVER .
- Refer to TAKING HOOD OUT OF THE SERVICE POSITION .
- Refer to CHECKING ENGINE OIL LEVEL .