Removing the fresh air flap motor
WARNING:
Working on 12 V electrical system. Risk of short circuits! Risk of fire!
- Make sure that there is no charger connected to the jump start terminal in the engine compartment.
- Detach battery ground lead from battery.
- For auxiliary batteries: Detach battery minus cables from all auxiliary batteries.
CAUTION:
Refrigerant circuit under high pressure. Injury hazard!
- Note and follow safety instructions on containers.
- Avoid contact with refrigerant; wear safety goggles and hand protection.
- For additional information see: 64 50 HANDLING REFRIGERANT and 64 50 NOTES Notes on air conditioning repair work
NOTE:
RISK OF DAMAGE, Damage to battery terminal, the safety battery terminal or the intelligent battery sensor (IBS). Damaged battery terminals can lead to malfunctions or vehicle electrical system faults.
- Detach battery terminal from battery pole by carefully shifting to and fro. Do not pry off using a tool.
NOTE:
TECHNICAL INFORMATION
The Controller drive must be read dressed after replacement.
Addressing can only be carried out with the diagnosis system.
The Controller drive must be read dressed after replacement.
Addressing can only be carried out with the diagnosis system.
Preliminary work
- Enter the INSTALLATION POSITION of the damper motor.
- Suction the AIR CONDITIONING .
- Disconnect all battery GROUND LEADS .
- Remove the rear passenger compartment air conditioning CONTROL PANEL (integrated automatic climate control with 4-zone control).
- Remove the rear VENTILATION GRILLE .
- Remove the rear VENTILATION GRILLE (air conditioning system with 4-zone control).
- Remove the rear center console TRIM .
- Remove the center armrest STORAGE COMPARTMENT .
- Remove the CENTER ARMREST .
- Remove the front storage compartment TRIM .
- Remove the center console TRIM .
- Remove CUPHOLDER .
- Remove the pedal mechanism TRIM PANEL .
- Remove right footwell TRIM PANEL .
- Remove the CENTER CONSOLE .
- Remove the right dashboard SIDE PANEL .
- Remove the right dashboard DECORATIVE STRIP .
- Remove the radio operating unit and the air conditioning CONTROL PANEL .
- Remove HEADUNIT HIGH (HU-H).
- Remove the dashboard speaker TRIM .
- Remove the dashboard mid-range SPEAKER .
- Remove both inner front door sill COVER STRIPS .
- Remove the left a-pillar footwell side TRIM PANEL .
- Remove the right-hand a-pillar footwell side TRIM PANEL .
- Remove left and right a-pillar TRIM PANEL .
- Remove the left dashboard SIDE PANEL .
- Remove the light OPERATING UNIT .
- Remove the left dashboard DECORATIVE STRIP .
- Remove CENTRAL INFORMATION DISPLAY (CID).
- Remove left fold-out COMPARTMENT .
- Remove the steering wheel or sports steering wheel AIRBAG UNIT .
- Remove the M sports steering wheel AIRBAG UNIT .
- Remove STEERING WHEEL .
- Remove STEERING WHEEL .
- Remove steering upper section column SHROUD .
- Remove lower part of steering column SHROUD .
- Remove the steering column SWITCH CLUSTER (SZL).
- Remove the INSTRUMENT CLUSTER (KOMBI).
- Remove instrument panel TRIM .
- Remove the acoustic COVER .
- Remove the left DME control unit COVER PANEL .
- Remove top clean AIR PIPE .
- Remove the bracket for cylinders 5 to 8 CONTROL UNIT .
- Remove coolant EXPANSION TANK .
- Remove left front-end strut left intake FILTER HOUSING .
- Release the intake pipe BRACKET .
- Disconnect the expansion valve REFRIGERANT LINE
- Remove the dashboard SUPPORT .
- Remove rear UNDERBODY PROTECTION .
- Remove the front THRUST FIELD .
- Remove the STIFFENING PLATE .
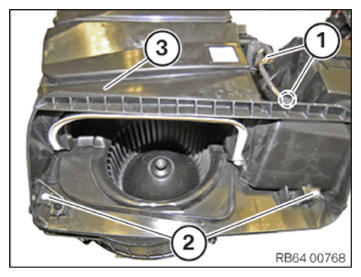
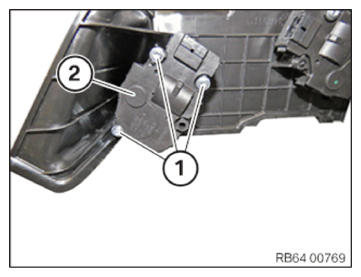
- Remove the heating and AIR-CONDITIONING UNIT .