Replacing the radial shaft seal for the torque converter (GA8HP50Z, GA8HP51Z)
Preliminary work
- Deactivate the 48 v ELECTRICAL SYSTEM .
- Disconnect all battery GROUND LEADS .
- If the active stabilizer is installed: remove fan COWL .
- Remove the transmission side UNDERBODY PLANKING
- Remove rear UNDERBODY PROTECTION .
- Remove the tunnel connecting SUPPORT .
- If installed: remove the right and left TORSION STRUT where required.
- Remove complete EXHAUST SYSTEM .
- Remove the HEAT SHIELDS .
- Remove the RETAINING PLATES
- Partially loosen the PROP SHAFT
- Remove AUTOMATIC TRANSMISSION (GA8HP50Z).
- Remove TORQUE CONVERTER
- Replace screws.
Parts: Screws
- To do so, it is essential to use the new parts from the drive repair kit.
The 13 Torx screws in the drive repair kit are equipped with a sealing ring.
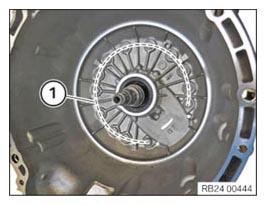
- Replace and hand-tighten the screws (1) along the dotted line.
The screws (1) must be replaced one by one. It is allowed to replace only one screw (1) at a time.
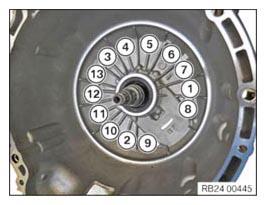
- Tighten screws in the order (1) to (13).TIGHTENING TORQUES SPECIFICATION
Centering plate on the transmission housing M8x74
Replace screwsJoining torque 10 Nm Angle of rotation 90° - Install the O-ring on the drive shaft.
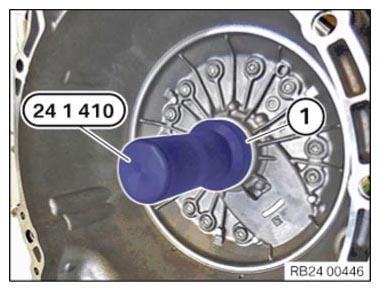
- Oil the sealing lip of the radial shaft seal with transmission oil.
- Strike the radial shaft seal (1) with the special tool 0 496 719 (24 1 410)
until it reaches the limit position.
Follow-up work
- Install the TORQUE CONVERTER
- Install AUTOMATIC TRANSMISSION (GA8HP50Z).
- Reconnect all battery GROUND LEADS .
- Check/top up the automatic transmission OIL LEVEL .
- If the active stabilizer is installed: install fan COWL .
- Fasten the (partially removed) PROP SHAFT
- Install the RETAINING PLATES .
- Install the HEAT SHIELDS
- Install the complete EXHAUST SYSTEM .
- If installed: install the right and left TORSION STRUT where required.
- Install the tunnel connecting SUPPORTS .
- Install rear UNDERBODY PROTECTION .
- Install the transmission side UNDERBODY PLANKING .
- Activate the 48 v ELECTRICAL SYSTEM .