Replacing front crankshaft seal
Preliminary work
- Refer to DEACTIVATING THE 48 V ELECTRICAL SYSTEM .
- Refer to DISCONNECTING ALL BATTERY GROUND LEADS .
- Refer to REMOVING THE ACOUSTIC COVER .
- Refer to REMOVING THE COVER ON LEFT AND RIGHT IN THE ENGINE COMPARTMENT AT THE TOP .
- Refer to REMOVE BOTH FRONT-END STRUTS .
- Refer to REMOVE FRONT CROSS CONNECTION .
- Refer to REMOVE THE REAR TOP CROSS CONNECTION .
- Refer to REMOVING THE FAN COWL .
- Refer to REMOVING THE INTAKE FILTER HOUSING (TENSION STRUT ON SHOCK TOWER REMOVED) .
- Refer to REMOVE TOP CLEAN AIR PIPE .
- Refer to REMOVE BOTTOM CLEAN AIR PIPE .
- Refer to REMOVE CHARGE AIR LINE .
- Refer to REMOVING THE DRIVE BELT FOR THE STARTER MOTOR GENERATOR .
- Refer to REMOVE THE FRONT UNDERBODY PROTECTION OR FRONT THRUST FIELD .
- Refer to REMOVING THE UNDERBODY PROTECTION OF THE STEERING GEAR AND THRUST FIELD RESPECTIVELY .
- Refer to REMOVING THE CENTER UNDERBODY PROTECTION .
- Refer to REMOVING STARTER MOTOR .
- Refer to REMOVING THE VIBRATION DAMPER .
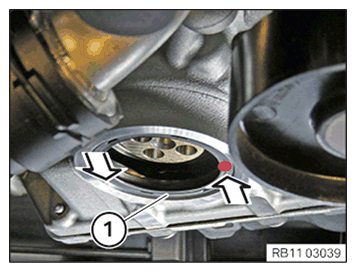
Removing the front crankshaft seal
- Drive in the crankshaft seal (1) in the marked area with a punch to approx. 1 cm deep.
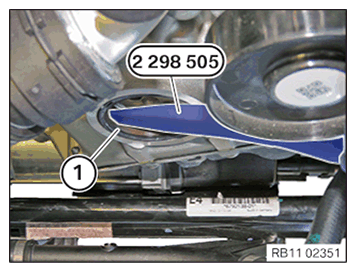
- Lever out the crankshaft sealing ring (1) with the special tool 2 298 505 .
- Make sure that the sealing surface on the crankcase is not scratched.
Installing the front crankshaft seal
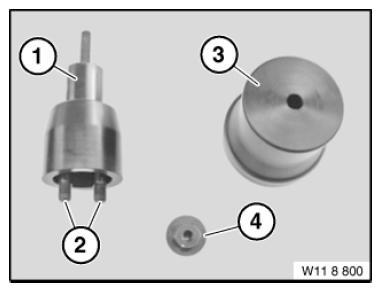
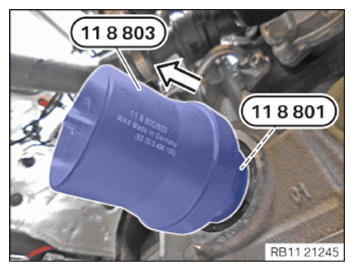
- Prepare special tool 0 496 130 (11 8 803)
.
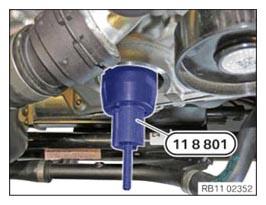
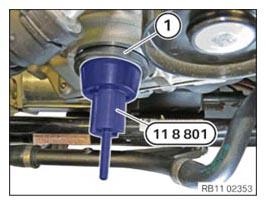
- Clean the special tool 0 496 128 (11 8 801) from the set of special tools 0 496 127 (11 8 800) and coat it with motor oil.
- Secure special tool 0 496 128 (11 8 801) to the crankshaft using special tool 0 496 129 (11 8 802) from the set of special tools 0 496 127 (11 8 800) .
NOTE:
RISK OF DAMAGE
Radial shaft seal damage.
Taping the sealing lip (inner) and applying oil to the radial shaft seal will lead to its destruction.
Radial shaft seal damage.
Taping the sealing lip (inner) and applying oil to the radial shaft seal will lead to its destruction.
- Do not tap the sealing lip (inner) of the radial shaft seal.
- Do not apply oil to the radial shaft seal.
- Install the radial shaft seal dry.
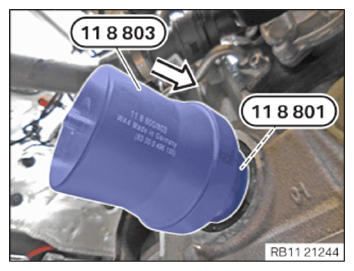
- Carefully slide the crankshaft sealing ring (1) straight in a rotational movement onto the special tool 0 496 128 (11 8 801) from the set of special tools 0 496 127 (11 8 800) until the crankshaft sealing ring (1) is positioned flush against the crankcase.
- Mount the special tool 0 496 130 (11 8 803)
on special tool 0 496 128 (11 8 801)
of the set of special tools 0 496 127 (11 8 800)
in arrow direction.
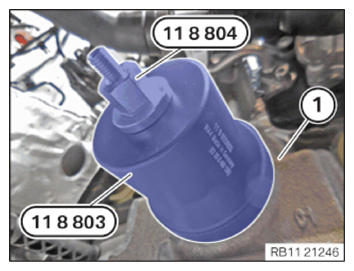
- Screw in the special tool (sleeve) 0 496 130 (11 8 803)
using the special tool 0 496 131 (11 8 804)
from the set of special tools 0 496 127 (11 8 800)
and a suitable tool until the sleeve is positioned flush against the crankcase (1).
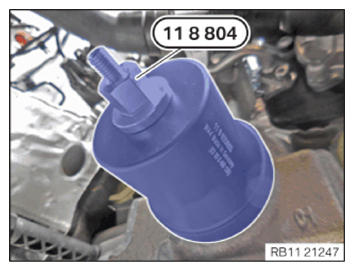
- Release the special tool 0 496 131 (11 8 804)
and remove.
- Feed out and remove the special tool 0 496 130 (11 8 803)
on the special tool 0 496 128 (11 8 801)
of the set of special tools 0 496 127 (11 8 800)
in arrow direction.
- Release the special tool 0 496 129 (11 8 802) .
- Feed out and remove the special tool 0 496 128 (11 8 801) 0 496 129 (11 8 802)
on the crankshaft.
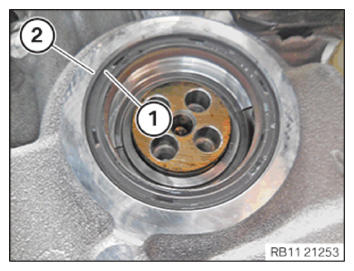
- Check the crankshaft sealing ring (1) for correct installation on the crankcase (2).
Follow-up work
- Refer to INSTALLING THE VIBRATION DAMPER .
- Refer to INSTALLING STARTER MOTOR .
- Refer to INSTALLING THE DRIVE BELT FOR THE STARTER MOTOR GENERATOR .
- Refer to INSTALL CHARGE AIR LINE .
- Refer to INSTALL BOTTOM CLEAN AIR PIPE .
- Refer to INSTALL CLEAN AIR PIPE, TOP .
- Refer to INSTALLING THE INTAKE FILTER HOUSING (TENSION STRUT REMOVED ON SHOCK TOWER) .
- Refer to INSTALL FAN COWL .
- Refer to INSTALL THE REAR TOP CROSS CONNECTION .
- Refer to INSTALL FRONT CROSS CONNECTION .
- Refer to INSTALLING BOTH FRONT-END STRUTS
- Refer to INSTALLING THE COVER ON THE LEFT AND RIGHT IN THE ENGINE COMPARTMENT AT THE TOP
- Refer to CONNECTING NEGATIVE BATTERY CABLE .
- Refer to ACTIVATING THE 48 V ELECTRICAL SYSTEM .
- Refer to INSTALLING ACOUSTIC COVER .
- Refer to INSTALL THE CENTER UNDERBODY PROTECTION .
- Refer to INSTALLING THE UNDERBODY PROTECTION OF THE STEERING GEAR OR THE FRONT THRUST FIELD .
- Refer to INSTALL THE FRONT UNDERBODY PROTECTION OR FRONT THRUST FIELD .
- Refer to CHECK ENGINE OIL LEVEL .