Preparing the replacement transmission
Preliminary work
- Disconnect all battery GROUND LEADS .
- If the active stabilizer is installed: remove fan COWL .
- Remove rear UNDERBODY PROTECTION .
- Remove the center UNDERBODY PROTECTION .
- Remove the front UNDERBODY PROTECTION/FRONT THRUST FIELD
- Remove the transmission side UNDERBODY PLANKING
- Remove the tunnel connecting SUPPORT .
- If installed: remove the right and left TORSION STRUT where required.
- Remove complete EXHAUST SYSTEM .
- Remove the HEAT SHIELDS .
- Remove the RETAINING PLATES
- Remove transmission CROSS-MEMBER .
- Partially loosen the PROP SHAFT
- Remove AUTOMATIC TRANSMISSION (GA8HP50Z).
CAUTION:
Materials harmful to health.
Contact with fluids harmful to health!
Contact with fluids harmful to health!
- Note and follow safety instructions on containers.
- Conduct all work in appropriate personal protective equipment only.
NOTE:
RISK OF DAMAGE
Damage to the transmission.
Damage to the transmission due to unapproved transmission oil.
Damage to the transmission.
Damage to the transmission due to unapproved transmission oil.
- Use only the approved TRANSMISSION OIL .
- Check the transmission OIL LEVEL after completing the repair.
NOTE:
TECHNICAL INFORMATION
Replacement transmissions come filled with oil
Replacement transmissions come filled with oil
NOTE:
TECHNICAL INFORMATION
Collect and dispose of emerging fluids. Observe country-specific waste disposal regulations.
Collect and dispose of emerging fluids. Observe country-specific waste disposal regulations.
NOTE:
TECHNICAL INFORMATION
After completion of the work, program the control unit for the electronic gearbox control (EGS).
After completion of the work, program the control unit for the electronic gearbox control (EGS).
NOTE:
TECHNICAL INFORMATION
When installing a new or replacement transmission, flush the transmission oil cooler and lines.
For ADDITIONAL INFORMATION see: Flushing 17 21 500 transmission oil cooler and lines (automatic transmission)
When installing a new or replacement transmission, flush the transmission oil cooler and lines.
For ADDITIONAL INFORMATION see: Flushing 17 21 500 transmission oil cooler and lines (automatic transmission)
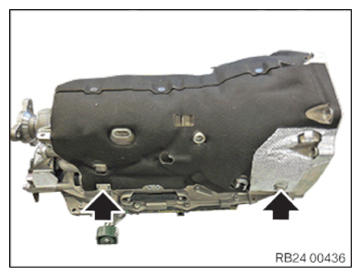
- Replace clamps (arrows) of sound insulation on the right.
Parts: Clamps
- Remount the sound insulation on the right.
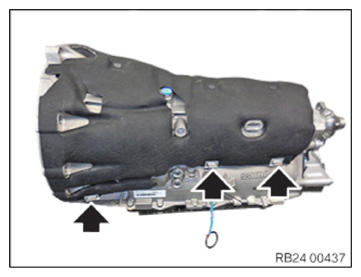
- Replace clamps (arrows) of sound insulation on the left.
Parts: Clamps
Remount the sound insulation on the left.
NOTE: TECHNICAL INFORMATION After disassembling the transportation retainer, secure the torque converter against slipping out. - Disassemble transportation retainers.
- Remount all cable clips.
- Remount all seal plugs.
- Remount protective cap on output shaft.
- Remount exhaust bracket.
- Remount transmission mounting bracket.
- If installed: Remount transfer box.
- Make note of transmission identification (see BMW Group parts/catalog sales and nameplate).
- Install AUTOMATIC TRANSMISSION (GA8HP50Z).
- Fasten the (partially removed) PROP SHAFT
- Install transmission CROSS MEMBER .
- Install the RETAINING PLATES .
- Install the HEAT SHIELDS .
- Install the complete EXHAUST SYSTEM .
- If installed: install the right and left TORSION STRUT where required.
- Install the tunnel connecting SUPPORTS .
- Reconnect all battery GROUND LEADS .
- Check/top up the automatic transmission OIL LEVEL .
- If the active stabilizer is installed: install fan COWL .
- Install rear UNDERBODY PROTECTION .
- Install the transmission side UNDERBODY PLANKING .
- Install the center UNDERBODY PROTECTION .
- Install the front UNDERBODY PROTECTION .
- ENCODE/PROGRAM control unit(s)