Replacing the radial shaft seal for the drive flange of the front axle differential
Preliminary work
- Refer to DEACTIVATING THE 48 V ELECTRICAL SYSTEM .
- Refer to DISCONNECTING ALL BATTERY GROUND LEADS .
- Refer to REMOVING REAR UNDERBODY PROTECTION .
- Refer to REMOVING THE UNDERBODY PLANKING OF THE TRANSMISSION ON THE SIDE .
- Refer to REMOVING EXHAUST SYSTEM .
- Refer to REMOVING THE HEAT SHIELDS .
- Refer to REMOVING TRANSMISSION CROSS-MEMBER .
- Refer to REMOVING THE RETAINING PLATES .
- Refer to PARTIALLY LOOSENING THE PROP SHAFT .
- Refer to REMOVING THE TRANSFER BOX (ATC 13-1) .
- Refer to REMOVING THE PROP SHAFT FRONT AT THE FRONT AXLE TRANSMISSION .
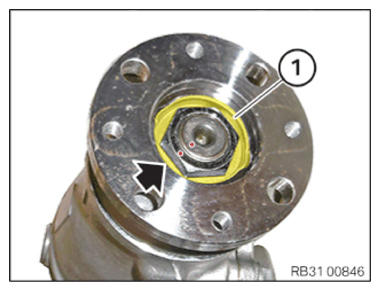
Remove the input flange of the front axle differential
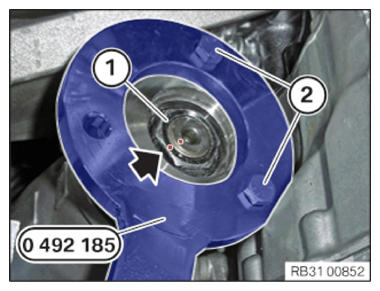
- Mark position of nut with respect to shaft with punch marks (arrow).
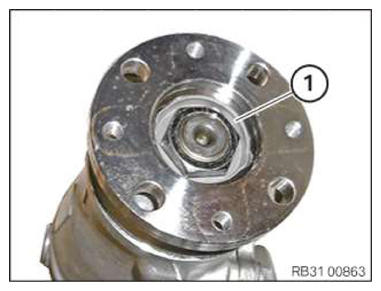
- Lever out and remove lock plate (1) with a suitable tool.
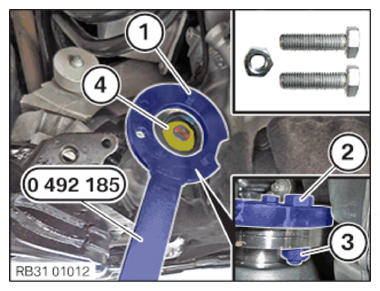
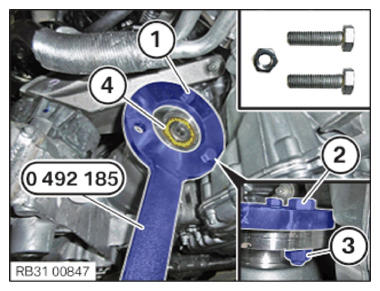
- Position special tool 0 492 185 (33 2 140) with one screw (M8x30) (1) on the drive flange.
- Hand-tighten the screw (M8x30) (2) through the bore on the drive flange with a nut (M8) (3).
- Tighten screw (M8x30) (1) hand-tight.
- Release nut (4). Counter support on the special tool 0 492 185 (33 2 140)
while doing so.
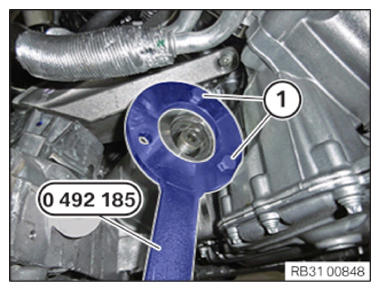
- Loosen screws (1). Remove the (M8) nut while doing so.
- Remove special tool 0 492 185 (33 2 140)
.
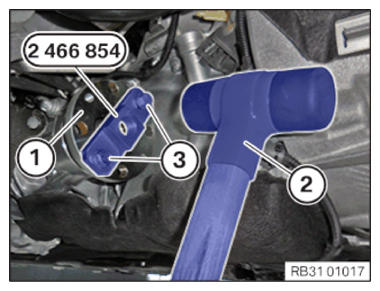
- Position the special tool 2 466 854 on the drive flange (1).
- Hand-tighten the bolts (2).
- Pull down the drive flange (1) by turning the spindle on the special tool 2 466 854
from the bevel drive pinion and remove it. Counter support with a suitable tool (3) on the special tool 2 466 854.
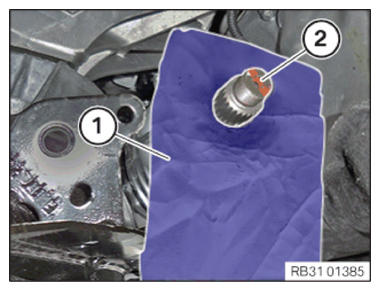
- Cut a small hole in a cloth (1).
- Slide cloth (1) over bevel drive pinion (2).
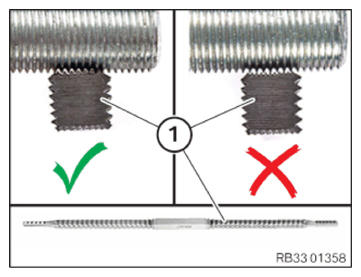
- Use thread file (1) to remove the adhesive residue.
Pay attention to the correct thread length without fail!
NOTE: TECHNICAL INFORMATION
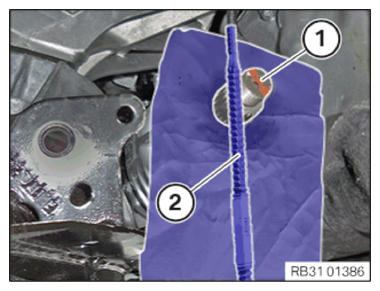
Keep the connection on the bevel drive pinion of the front axle transmission clean and free of oil and grease. - Thoroughly clean the thread all around on the bevel drive pinion (1) with the thread files (2) from the adhesive residues.
- Clean the thread and the gearing on the bevel drive pinion (1).
- Remove the cloth from the bevel drive pinion (1).
Removing the radial shaft seal of the drive flange
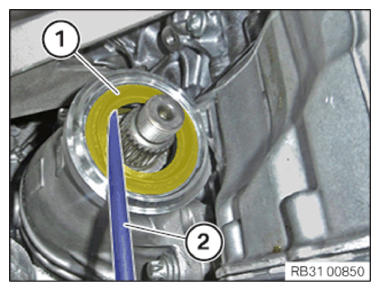
- Lift out and remove the radial shaft seal (1) from the front axle transmission using a suitable tool (2).
- Replace the radial shaft seal for the drive flange of the front axle differential.
Parts: Radial shaft seal
Installing the radial shaft seal of the drive flange
- Coat the sealing lips of radial shaft seal with front axle differential oil.
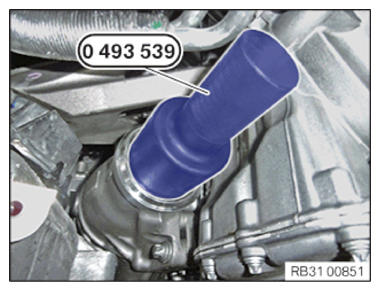
- Use special tool 0 493 539 (31 5 130)
to strike the radial shaft seal up to the stop of the front axle transmission.
Install the input flange of the front axle differential
NOTE: TECHNICAL INFORMATION
Keep the connection on the bevel drive pinion of the front axle transmission clean and free of oil and grease. - Clean the gearing on the drive flange (1).
- Unscrew the spindle from the special tool 2 466 854.
- Position the drive flange (1) with the special tool 2 466 854
on the front axle transmission and tap it with a rubber mallet (2) up to the stop on the drive shaft.
- Loosen screws (3).
- Remove the special tool 2 466 854.
- Position special tool 0 492 185 (33 2 140) with one screw (M8x30) (1) on the drive flange.
- Hand-tighten the screw (M8x30) (2) through the bore on the drive flange with a nut (M8) (3).
- Tighten screw (M8x30) (1) hand-tight.
- Unscrew the nut (4) manually on the drive shaft.NOTE: RISK OF DAMAGE
Damage to the front axle differential.
If the nut is tightened beyond the punch mark, the clamping sleeve and therefore the front axle differential is damaged.- Only tighten the nut up to the punch mark.
- Tighten the nuts (1) until the punch marks (arrow) on the nut and the drive shaft match. Counter support by using the special tool 0 492 185 (33 2 140) .
- Loosen screws (2). Remove the nut (M8) while doing so.
- Remove special tool 0 492 185 (33 2 140) .
- Replace the lock plate (1).
Parts: Lock plate
- Position and insert lock plate (1).
Follow-up work
- Refer to INSTALLING THE FRONT PROP SHAFT .
- Refer to INSTALLING THE TRANSFER BOX (ATC 13-1) .
- Refer to DISCONNECTING ALL BATTERY GROUND LEADS .
- Refer to ACTIVATING THE 48 V ELECTRICAL SYSTEM .
- Refer to CHECKING/TOPPING UP THE TRANSFER BOX OIL (ACTIVE TORQUE CONTROL 13-1) .
- Refer to CHECKING/ADDING FRONT AXLE TRANSMISSION OIL .
- Refer to FASTENING THE PROP SHAFT (PARTIALLY REMOVED) .
- Refer to INSTALLING THE RETAINING PLATES .
- Refer to INSTALLING TRANSMISSION CROSS MEMBER .
- Refer to INSTALLING THE HEAT SHIELDS .
- Refer to INSTALLING EXHAUST SYSTEM .
- Refer to INSTALLING THE UNDERBODY PLANKING OF THE TRANSMISSION ON THE SIDE .
- Refer to INSTALLING REAR UNDERBODY PROTECTION .