Check the coefficient of friction for the crankshaft
Check
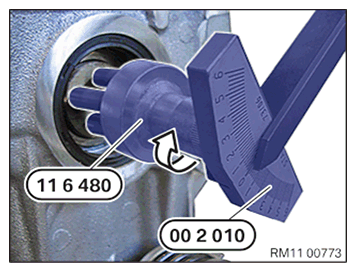
- Turn the crankshaft clockwise with the special tool 0490130 (002010)
and compare the reading on the scale to the maximum permitted torque.TECHNICAL DATA - TORQUE SPECIFICATION
Maximum permitted torque of the crankshaft max. 2 Nm Result
» The maximum permitted torque is exceeded.
Measure
- Correct the radial clearance.
Check
- Check the classification of the main bearing shells and the guide bearing shells.
Result
» Classification of the main bearing shells and the guide bearing shells is not correct.
Measure
- Correct the classification of the main bearing shells and the guide bearing shells.
Check
- Check if the main bearing shells and the guide bearing shells are installed correctly.
Result
» The main bearing shells and guide bearing shells are not correctly installed.
Measure
- Install the main bearing shells and the guide bearing shells correctly.
Follow-up Work
- Refer to INSTALLING ALL PISTONS WITH CONNECTING ROD (530e PHEV 2018-2020) , or INSTALLING ALL PISTONS WITH CONNECTING ROD (530e xDrive PHEV 2018-2020) .
- Refer to INSTALL BOTH TIMING CHAINS .
- Refer to INSTALLING THE OIL DEFLECTOR
- Refer to INSTALL THE OIL VACUUM PUMP (530e PHEV 2018-2020) , or INSTALL THE OIL VACUUM PUMP (530e xDrive PHEV 2018-2020) .
- Refer to INSTALLING THE REAR TIMING CASE COVER .
- Refer to REFITTING SUMP (530e PHEV 2018-2020) , or REFITTING ENGINE OIL PAN (530e xDrive PHEV 2018-2020) .
- Refer to INSTALLING THE FLYWHEEL .
- Refer to INSTALLING THE VIBRATION DAMPER .
- Refer to SEALING THE OIL DUCT .
- Refer to CLEAN SEALING SURFACES .
- Refer to REPLACE CYLINDER HEAD GASKET .
- Refer to INSTALLING THE CYLINDER HEAD .
- Refer to ATTACH THE OIL RETURN LINE FOR THE EXHAUST TURBOCHARGER .
- Refer to BLOCKING THE CAMSHAFTS
- Refer to INSTALL EXHAUST CAMSHAFT ADJUSTER .
- Refer to INSTALL VANOS CENTRAL VALVE OF THE EXHAUST SIDE .
- Refer to INSTALLING THE INTAKE ADJUSTER .
- Refer to INSTALL VANOS CENTRAL VALVE OF THE INTAKE SIDE .
- Refer to PRELOAD TIMING CHAIN
- Refer to TIGHTENING THE VANOS CENTRAL VALVE .
- Refer to DISASSEMBLING ALL SPECIAL TOOLS
- Refer to CHECKING CAMSHAFT TIMING .
- Refer to INSTALLING THE ACOUSTIC COVER FOR THE OIL SUMP .
- Refer to INSTALLING THE THERMOSTAT ON THE TRANSMISSION OIL LINES .
- Refer to INSTALL THE CYLINDER HEAD COVER (ENGINE REMOVED)
- Refer to INSTALL FRONT ENGINE ENCAPSULATION .
- Refer to INSTALL THE COOLANT FEED LINE FOR THE EXHAUST TURBOCHARGER (COOLANT RETURN LINE REMOVED)
- Refer to INSTALL THE COOLANT RETURN LINE FOR THE EXHAUST TURBOCHARGER (AUXILIARY COOLANT PUMP REMOVED)
- Refer to INSTALLING AUXILIARY COOLANT PUMP FOR THE EXHAUST TURBOCHARGER .
- Refer to INSTALL BOTH ACTUATORS (ENGINE REMOVED)
- Refer to PREPARE FOR THE INSTALLATION OF THE HIGH PRESSURE PUMP
- Refer to INSTALL HIGH PRESSURE PUMP .
- Refer to INSTALLING FUEL DELIVERY LINE .
- Refer to PREPARE THE INJECTORS FOR INSTALLATION .
- Refer to INSTALL INJECTORS
- Refer to INSTALLING THE HIGH-PRESSURE LINE BETWEEN THE HIGH-PRESSURE PUMP AND THE HIGH-PRESSURE RAIL .
- Refer to INSTALLING THE IGNITION COILS .
- Refer to INSTALLING THE INTAKE PLENUM .
- Refer to INSTALLING THE TANK VENT VALVE .
- Refer to TIGHTENING THE OIL DRAIN PLUG
- Refer to TIGHTENING THE OIL FILTER CAP
- Refer to INSTALLING THE DRIVE BELT FOR THE COOLANT PUMP .
- Refer to TOPPING UP THE MOTOR OIL
- Refer to REMOVE ENGINE FROM ASSEMBLY STAND