Install both timing chains
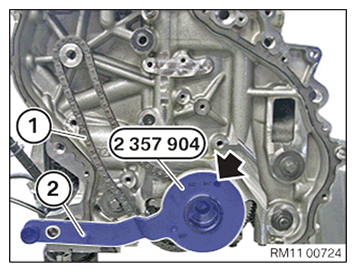
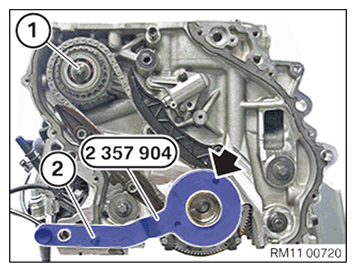
- Position the timing chain (1).
- Position the special tool 2 357 904
on the guide pin (arrow) of the crankshaft and secure it with the bolt (2) on the crankcase.
- Replace the bearing journals (1) and (4).
Parts: Bearing journal
- Clean all of the screw threads of the bearing journals. Use a thread cutter as needed.
- Install the camshaft sprocket and hand-tighten the bolt.
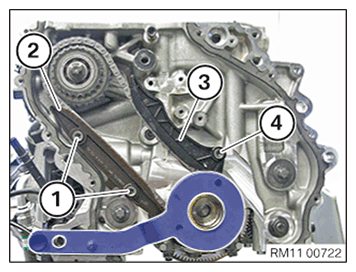
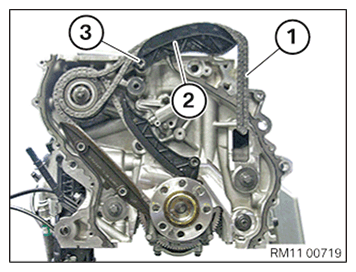
- Position the guide rail (2).
- Screw in and tighten both bearing journals (1).TIGHTENING TORQUES SPECIFICATION
Bearing journal of tensioning and guide rail M8 Tightening torque 20 Nm - Position tensioning rail (3).
- Screw in and tighten the bearing journals (4).TIGHTENING TORQUES SPECIFICATION
Bearing journal of tensioning and guide rail M8 Tightening torque 20 Nm - (1) Clean sealing surfaces.
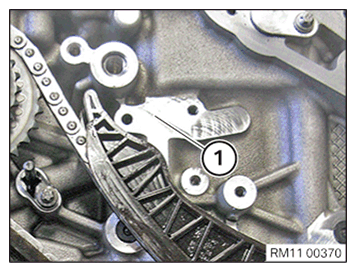
- Install the chain tensioner and tighten the bolts (1).TIGHTENING TORQUES SPECIFICATION
Chain tensioner to crankcase M6x22 Tightening torque 10 Nm - Secure the chain tensioner piston (3) with the screwdriver (2).
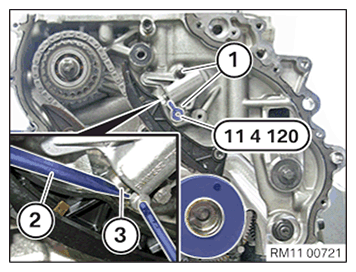
- Remove special tool 0 491 012 (11 4 120)
and slowly remove the screwdriver (2).
- Replace the screw (1).
Parts: Screw
- Tighten down screw (1).TIGHTENING TORQUES SPECIFICATION
Camshaft sprocket with bearing to crankcase M12x1.5 Tightening torque 108 Nm - Mount the tensioning rail (2) on the bearing journal (3).
- Attach the timing chain (1) on the camshaft sprocket and position it correctly on the tensioning rail (2).
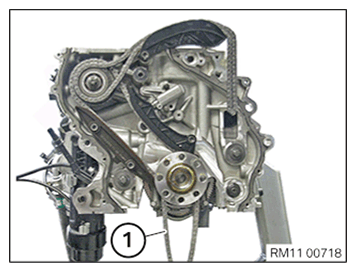
- Mount the drive chain (1) on the crankshaft.
Follow-up Work
- Refer to INSTALLING THE OIL VACUUM PUMP .
- Refer to INSTALLING THE REAR TIMING CASE COVER .
- Refer to REFITTING SUMP .
- Refer to INSTALLING THE FLYWHEEL .
- Refer to SEALING THE OIL DUCT .
- Refer to CLEANING SEALING SURFACES .
- Refer to INSTALLING THE CYLINDER HEAD .
- Refer to ATTACHING THE OIL RETURN LINE FOR THE EXHAUST TURBOCHARGER .
- Refer to BLOCKING THE CRANKSHAFT IN HE TDC FIRING POSITION OF CYLINDER 1 .
- Refer to BLOCKING THE CAMSHAFTS .
- Refer to INSTALLING THE INTAKE ADJUSTER .
- Refer to INSTALLING VANOS CENTRAL VALVE OF THE INTAKE SIDE .
- Refer to INSTALLING EXHAUST CAMSHAFT ADJUSTER .
- Refer to INSTALLING VANOS CENTRAL VALVE OF THE EXHAUST SIDE .
- Refer to PRELOAD TIMING CHAIN .
- Refer to TIGHTENING THE VANOS CENTRAL VALVE .
- Refer to DISASSEMBLING ALL SPECIAL TOOLS .
- Refer to CHECKING CAMSHAFT TIMING .
- Refer to INSTALLING THE THERMOSTAT ON THE TRANSMISSION OIL LINES .
- Refer to INSTALLING THE STARTER MOTOR (ACOUSTIC COVER REMOVED) .
- Refer to INSTALLING THE ACOUSTIC COVER FOR THE OIL SUMP .
- Refer to INSTALLING THE CYLINDER HEAD COVER (ENGINE REMOVED) .
- Refer to INSTALLING BOTH ACTUATORS (ENGINE REMOVED) .
- Refer to PREPARING FOR THE INSTALLATION OF THE HIGH PRESSURE PUMP .
- Refer to INSTALLING HIGH PRESSURE PUMP .
- Refer to PREPARING THE INJECTORS FOR INSTALLATION .
- Refer to INSTALLING INJECTORS .
- Refer to INSTALLING THE HIGH-PRESSURE LINE BETWEEN THE HIGH-PRESSURE PUMP AND THE HIGH-PRESSURE RAIL .
- Refer to INSTALLING THE IGNITION COILS .
- Refer to INSTALLING THE INTAKE PLENUM .
- Refer to INSTALLING THE TANK VENTING VALVE .
- Refer to INSTALLING OIL FEED LINE FOR EXHAUST TURBOCHARGER (ENGINE ENCAPSULATION REMOVED) .
- Refer to INSTALLING FRONT ENGINE ENCAPSULATION .
- Refer to INSTALLING THE COOLANT FEED LINE FOR THE EXHAUST TURBOCHARGER (COOLANT RETURN LINE REMOVED) .
- Refer to INSTALLING THE COOLANT RETURN LINE FOR THE EXHAUST TURBOCHARGER (AUXILIARY COOLANT PUMP REMOVED) .
- Refer to INSTALLING AUXILIARY COOLANT PUMP FOR THE EXHAUST TURBOCHARGER .
- Refer to TOPPING UP THE MOTOR OIL .
- Refer to REMOVING ENGINE FROM ASSEMBLY STAND .