Replacing the rear crankshaft seal
Removing the rear crankshaft seal
- Provide a vacuum cleaner.
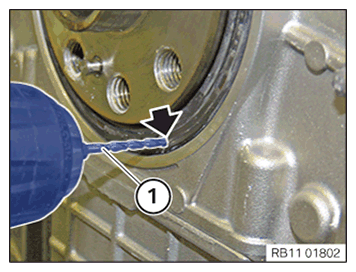
- Drill a hole into the crankshaft seal using a 2.5 mm drill (1).
- Immediately remove the shavings from the crankshaft seal (1) carefully using a vacuum cleaner.
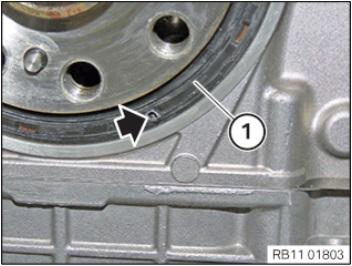
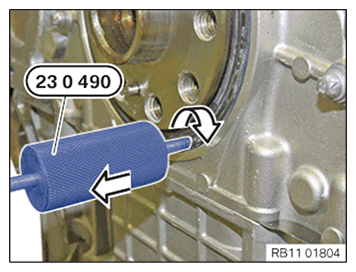
- Screw in the special tool 0 491 454 (23 0 490) into the crankshaft seal.
- Drive out the crankshaft seal using the special tool 0 491 454 (23 0 490).
Installing the rear crankshaft seal
NOTE: TECHNICAL INFORMATION
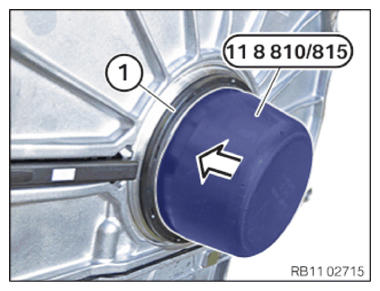
The radial shaft seal must be installed dry. Do not use motor oil or lubricant. - Install special tool 0 496 137 (11 8 815) on the crankshaft.
- Pull off crankshaft sealing ring (1) in the arrow direction using special tool 0 496 137 (11 8 815)
so that crankshaft sealing ring (1) rests all around the timing case cover.
- Guide the special tool 0 496 137 (11 8 815) out and remove.
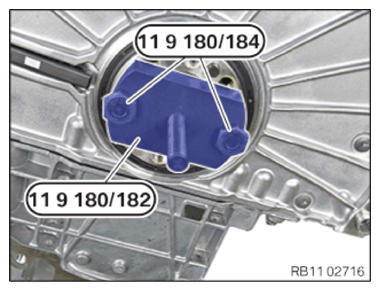
- Secure special tool 0 494 029 (11 9 182)
to the crankshaft using special tool 0 494 031 (11 9 184).
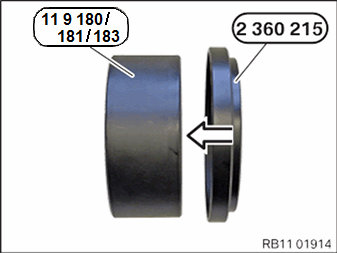
- Connect special tool 2 360 215
to special tool 0 494 028 (11 9 181)
in the arrow direction.
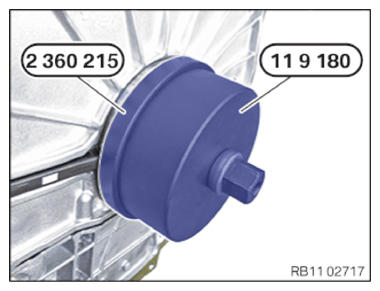
- Position special tools 0 494 028 (11 9 181) and 2 360 215 and bring into contact with the crankshaft seal in connection with special tool 0 494 030 (11 9 183).
- Check the freedom of movement between the special tool 2 360 215 and the crankshaft sensor during installation.
- Screw in the crankshaft sealing ring up to the stop of the timing case cover using special tool 2 360 215.
Follow-up work
- Refer to CLEAN SEALING SURFACES .
- Refer to INSTALLING THE CYLINDER HEAD GASKET .
- Refer to INSTALLING THE CYLINDER HEAD .
- Refer to REFITTING ENGINE OIL PAN .
- Refer to TIGHTENING THE OIL DRAIN PLUG .
- Refer to INSTALLING THE FLYWHEEL .
- Refer to TURNING THE ENGINE ON THE VIBRATION DAMPER
- Refer to BLOCKING THE CRANKSHAFT IN THE TDC FIRING POSITION OF THE FIRST CYLINDER (AUTOMATIC TRANSMISSION) .
- Refer to BLOCKING THE CAMSHAFTS .
- Refer to INSTALLING THE INTAKE ADJUSTER .
- Refer to INSTALL EXHAUST CAMSHAFT ADJUSTER .
- Refer to PRELOAD TIMING CHAIN .
- Refer to TIGHTENING THE VANOS CENTRAL VALVE .
- Refer to CRANK ENGINE TWICE (AUTOMATIC TRANSMISSION) .
- Refer to DISASSEMBLING ALL SPECIAL TOOLS
- Refer to INSTALL THE COOLANT FEED LINE (COOLANT RETURN LINE IS REMOVED) .
- Refer to INSTALL THE REAR SECTION OF THE COOLANT RETURN LINE (FRONT SECTION REMOVED) .
- Refer to INSTALL THE FRONT SECTION OF THE COOLANT RETURN LINE .
- Refer to INSTALLING THE AUXILIARY COOLANT PUMP .
- Refer to INSTALLING THE INTAKE PLENUM .
- Refer to INSTALLING THE TANK VENT VALVE .
- Refer to TIGHTENING THE OIL FILTER CAP .
- Refer to SECURING THE OIL FEED LINE TO THE ENGINE BLOCK .
- Refer to INSTALLING THE OIL RETURN LINE FOR THE EXHAUST TURBOCHARGER .
- Refer to INSTALLING THE SUPPORT FOR THE EXHAUST TURBOCHARGER .
- Refer to INSTALLING CYLINDER HEAD COVER .
- Refer to INSTALLING BOTH ACTUATORS .
- Refer to INSTALLING THE INJECTORS FOR THE CYLINDERS 4 TO 6 .
- Refer to INSTALLING THE INJECTORS FOR THE CYLINDERS 1 TO 3 .
- Refer to PREPARE FOR THE INSTALLATION OF THE HIGH PRESSURE PUMP .
- Refer to INSTALL HIGH PRESSURE PUMP .
- Refer to INSTALL THE HIGH-PRESSURE LINE BETWEEN THE HIGH-PRESSURE RAIL AND THE HIGH-PRESSURE PUMP .
- Refer to INSTALLING THE IGNITION COILS .
- Refer to INSTALL FRONT ENGINE ENCAPSULATION .
- Refer to INSTALL CHARGE AIR LINE
- Refer to INSTALL BOTTOM CLEAN AIR PIPE .
- Refer to REMOVING THE ENGINE FROM THE ASSEMBLY JIG
- Refer to ALIGNING THE ENGINE ON THE FRONT AXLE SUPPORT .
- Refer to INSTALL THE ENGINE SUPPORT ARMS ON THE ENGINE MOUNTS ON THE LEFT AND THE RIGHT .
- Refer to CHECKING LINING SLEEVES .
- Refer to SECURE THE JUNCTURE SHAFT IN FRONT ON THE FRONT AXLE DIFFERENTIAL .
- Refer to INSTALLING THE ENGINE ON THE AUTOMATIC TRANSMISSION (FOR MOBILE LIFTING TABLE) .
- Refer to FLANGE-MOUNT TRANSMISSION .
- Refer to INSTALL THE EXHAUST BRACKET .
- Refer to TIGHTEN TRANSMISSION SCREWS .
- Refer to REMOVE THE SPECIAL TOOL FROM THE TORQUE CONVERTER .
- Refer to TURNING THE ENGINE HAND FORCE .
- Refer to TIGHTEN CONVERTER BOLT .
- Refer to LOCK THE CONNECTOR WITH THE SEALING SLEEVE .
- Refer to FIX HYDRAULIC LINES .
- Refer to INSTALLING STARTER MOTOR .
- Refer to INSTALL THE FRONT OUTPUT SHAFTS (ON THE MOBILE LIFTING TABLE) .
- Refer to INSTALL CATALYTIC CONVERTER .
- Refer to REPLACING THE OXYGEN MONITOR SENSOR
- Refer to REPLACING THE LAMBDA OXYGEN SENSOR
- Refer to CLIP THE COOLANT LINE IN AT THE FRONT AXLE SUPPORT .
- Refer to TOPPING UP THE MOTOR OIL
- Refer to INSTALLING THE COMPLETE FRONT AXLE INCLUDING ENGINE AND TRANSMISSION .